Toasted Oats Bread with the Bread Baking Babes Facebook group

Well the Bread Baking Babes got me baking along again. I don’t blog about it every time, but this time the recipe was so delicious, I couldn’t resist. Elizabeth Morris is the one that encouraged me to try sourdough again about a year ago and that’s what I’ve been making almost exclusively since. Her recipe is here: https://etherwork.net/blog/bbb-january-2021/

I had some challenges with this bread. Following the directions exactly had the levain rise and deflate by morning. Thus it wouldn’t pass the float test. Not deterred I got my active starter out of the fridge and kept it warm in a water bath using my sous vide stick set to 95°F. Within an hour it passed the float test and I moved along. I added the original levain too. Which made the dough too wet, 60g or so of flour helped. 

I also add my salt right at the beginning as Foodgeek (Sune) on YouTube has tested and there’s really no discernible difference. And I followed my own routine for sourdough, which is fairly close to the original recipe. But I also give you a way to use the stand mixer for the whole process. 

We like smaller loaves for slicing and portion control. So, I ended up making two loaves. I baked one the same day and one the next morning after a fridge proof overnight. Both were baked in my Anova Precision Oven using the steam feature. Both loaves got pretty dark.


Bread Baking Babes Facebook Group


Ingredients

Leavener

  • 60 grams ‘no additives’ 100% whole wheat flour
  • 60 grams water
  • dessert spoon of starter from the fridge (about 30 grams)
  • OR 150g active starter

Oats

  • 100 grams rolled oats, toasted
  • 100 grams boiling water

Actual Dough

  • 100 grams 100% whole wheat ‘no additives’ flour
  • 400 grams unbleached ‘no additives’ all-purpose flour
  • 10 grams wheat germ (this was originally “5 grams” in the recipe given to the BBBabes)
  • 5 grams malted wheat chops
  • 325 grams water
  • all of the leavener from above, when a small forkful floats in a glass of cool water
  • 10 grams salt 
  • all of the rolled oats mixture from above

Topping (optional)

  • quick oats

Directions

Leavener: In the evening of the day before making the bread: Put the starter, flour and water into a smallish bowl. Mix with a wooden spoon until the flour is stirred in well. Cover the bowl with a plate and set aside overnight in the oven with only the light turned on. Unless it is ridiculously hot in the kitchen. In that case, leave the oven light turned off. Mine failed so I used 150g of active starter and would do that again.

Prepare the Oats: Pour rolled oats into a dry cast iron frying pan and place it over medium high heat, stirring with a wooden spoon from time to time. It takes about about 7 minutes to toast the oats. (They smell wonderful!) Transfer the toasted oats into a medium-sized bowl and pour boiling water over top. Cover and leave overnight in the oven with the leavener, if using.

Autolyse: Mix the dough In the morning of the day you will be making the bread: When a small forkful of the leavener floats in a small bowl of room temperature water, you can go ahead and mix the dough: Sift the whole wheat flour into a stand mixer’s mixing bowl, reserving the bran for after shaping. (I wouldn’t next time as there is bran all over my kitchen now.) Add all-purpose flour, wheat germ, malted wheat chops, salt and 325 grams water (body temperature if the kitchen is cold) to the sifted whole wheat flour. Use the paddle attachment and run the mixer until everything is incorporated and the dough pulls away from the sides. Set aside for 30 minutes to an hour.

Add the 150g of starter or the leavener to the bowl. Use a dough hook to knead for 8-10 minutes, until the dough passes the windowpane test. Rest covered for 30 minutes.

Adding the oats and first stretching and folding: Add the oats overtop. Turn the bowl as you fold and re-fold the dough into the center, to distribute the oats. Cover the bowl and leave on the counter. In lieu of stretch and fold you may choose to leave the dough hook on the mixer and run it for a minute or two. If you prefer coil folds or stretch and slap, go for it. Repeat every 30 minutes for a total of two hours.

Leave the covered bowl in a draft free area another hour or two until the dough puffs. Mine came nowhere near doubling as the original recipe says. But I’ve learned that 4 hours total from mixing in the starter works out about every time.

Pre-shaping: Scatter a dusting of rice flour on the board and gently place the dough on the flour. I divide it in half at this point or you may continue and make one large loaf. Form the loaf in your preferred method. I flatten in out and pull the corners up over and over until a round ball is formed .Turn it over on the board and pull it towards you with your hands on the board. Repeat the pull a few times, rotating the loaf ¼ turn each time. This video shows the method I use. Repeat for the second loaf it making one. Let sit 30 minutes and then repeat this whole process.

Prepare the brotforms: Liberally coat the insides of a brotforms with rice flour. Or a bowl lined with a lint free kitchen towel. Those flour sack towels work well for this.

Adding optional topping: Optional: Wet your hands and rub them gently over the top. Scatter quick oats overtop. Now carefully put the shaped loaf seam-side UP into the brotform. Optional: Scatter the reserved bran evenly onto the seam area. Cover with a kitchen towel or an overturned mixing bowl and let sit for an hour or so until it passes the poke test. You want to poke it and have it spring back fairly quickly. At this point I put one loaf in the fridge in a zip lock bag for an overnight proof. 

Preheating the oven:  Set your oven to 450°F. And prepare your steaming method. I’m lucky to have the Anova Precision Oven that steams. So I just have to set it to steam during the first stage.

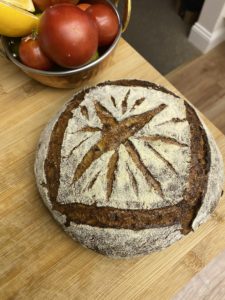
Scoring: When the oven is thoroughly preheated transfer the loaf to the oven or dutch oven if using.

Baking: Bake for 20 minutes with steam on for a large loaf, 15 minutes for smaller. Lower the oven temperature to 400°F and bake until the internal temperature is 210°F. This is the best method for assuring it’s cooked properly.

Cooling: When the bread has finished baking, remove it from the oven and allow it to cool on a footed rack before slicing and eating; the bread is still cooking internally when first removed from the oven! If you wish to serve warm bread (of course you do), reheat it after it has cooled completely: To reheat any uncut bread, turn the oven to 400F for 5 minutes or so. Turn the oven OFF. Put the bread into the hot oven for about ten minutes. This will rejuvenate the crust and warm the crumb perfectly.


Notes

My version here is based on Elizabeth Morris’ blog post recipe and I’ve made changes to the process for how I made it. 

I really like white rice flour the best for shaping and making scoring patterns on the top. I can get rid of stickiness very quickly with very little flour. Brown rice flour works for shaping but to get nice scoring patterns white works way better. 

I sifted out the bran and wouldn’t do that again. I put it all on the bottom as the recipe suggested, but it didn’t stick well and just ended up everywhere.

What are malted wheat chops? They are malted wheat berries crushed. I went to a brewery supply place and asked about them and after a lot of confusion about the term berries, I left with a pound of malted wheat GRAINS(berries). I measured out what I needed for the recipe and ran my rolling pin over them. I’d be tempted to test adding more and leaving them whole for a nutty crunch in the bread. 

While at the brewery supply I also bought some malted rye. I ground it up in my Blendtec blender into flour and it smells absolutely heavenly. I can’t wait to make rye bread again. 

5 comments

  1. Elizabeth

    Both loaves look fabulous! I particularly like the deep mahogany colour of the crust. The crumb looks excellent too. And I’m very happy to learn that your sourdough baking is going so well.

    I have never been very successful with the overnight fridge proofing (results in flat loaves for me…) so am very excited to see your side-by-side results, showing that overnight proofing works brilliantly.

    Do put your extra malted grains in the freezer – they will last beautifully there. Eons ago (3 years??), we bought about a pound each of malted wheat, barley, and rye. Alas, all the malted rye is gone (so is the shop we bought the grains at) but we still have at least 200 grams each left of the malted wheat and barley.

    The malted rye will be great in rye bread, but it’s also really delicious in primarily wheat bread.

    1. Scott Davis

      Well when I make rye it’s usually 25% or less. I add in caraway, anise and fennel seeds. This results in a nice light loaf with good flavor and taste.

      Thanks for the hint about the freezer. I only bought a pound of each.

      BTW you were in SPAM. No clue why.

  2. Kelly

    Both loaves are beautiful! Wow that pop on the overnight chilled rise though! Love your process and the way you modified and learned things. Now I need to see if our local brewery store carries malted grains to try out myself…

    1. Scott Davis

      I cut the higher loaf today. It’s no lighter than the first. It just spread less as it was cold from the fridge. I will use this as a template for my next rye loaf as I have rye flakes and malted rye flour.

  3. Tanna

    Truly you are a bread baker Scott! Both of these are impressive loaves. Very smart to try the refrigerator overnight/bake next morning!
    We really loved this loaf and have baked it several times since.

Leave a Reply

Your email address will not be published. Required fields are marked *